You may have noticed that The Addiction has been SLOW lately. Well...
We are expecting our first child within a week or so!We have spent quite a bit of time on the baby's room lately. I thought I would share what we have done...
Being that we are into vintage style and not really into the cutesy bears and bunnies nursery things. We went with a Vintage Cowboy room (yep, it is a boy). Many childern of the 50's were big time into the westerns and their cowboy heros and thought it would make for a neat room. We wanted a room that he wouldn't grow out of in a year. The cowboy theme is kinda popular right now with expecting parents. That means there is a lot of sets to chose from on the market. The goal was to make a room knowing that we could do this in the DIY style instead of paying big bucks for things we could make ourselfs. The colors we selected were red, light blue, and tans/browns. We found a fabric we liked that had a really neat pattern...
http://www.thefabricfinder.com/GoldingRodeoDenim3.JPGWe also wanted to incorporate our vintage style along with the new made items. If you really shop around you can find some pretty good deals out there. Making a large portion of it really helped with the cost of it. My Mother help out a ton and we thank her a bunch for that.
I'm pretty happy with the way it turned out. Insead of me blabbing on about it, lets take a look...
This is the entry from the hallway...

Here is the entry from the bathroom side. We wanted to keep the wall color simple. We thought about doing a wall in cowboy wall paper but figured that it would get too busy with the fabric pattern. I made the window cornices/valances (or whatever you want to call them) with the fabric for the tan roman shades..

The crib is vintage and has been in Molly's family for a long time. Don't worry, It checks out and won't be a problem...
The crib bumpers and skirt was made by my Mother. She did a great job. Sadly, I couldn't get a very good picture of them. She bought a bumper kit and made them from the cowboy fabric...
My Mom also used a bears and bunnies mobile and converted it to a more appropriate horse mobile. She use the fabric and little toy horses from
The Oriental Trading Company...

We picked up these vintage Broyhill dressers off of Craigslist for only $125. They are in great shape and provide a lot of needed storage. The stick pony a gift from my parents and is vintage 1940's. Unfortunately, I didn't get a good picture of the framed photo on the wall. We found the picture of Roy Rogers, Dale Evans, and Gabby Hayes for a whole $2.50 at an antique store. I found the frames for all of the art in the room at St. Vincent De Paul for 2 bucks each. The Roy Rogers picture has a matte I made using cut paper...
I found this old magazine of short stories for $2.50. I liked the cover a lot but the poor magazine was falling apart. I used another frame from St. Vinnies and it worked great because it already had a matte in it. I only backed it with the tan paper and mounted it...
The magazine was too worn to save but it had a bunch of cool line drawings in it. I cut them out and decoupaged them to another St. Vinnies frame...
The cardboard cutouts above the crib are vintage 50's from the Dolly Toy Company. They actually hung in Molly's Dad's room when he was young...

We kept the lighting pretty simple. The vintage lamp was given to us from a family friend a year ago and works perfectly in the room. I had to rewire and refinish the base but its a great little lamp...

The vintage cowboy shade was found on Ebay for a pretty good price...

Another Mom made item is this diper stacker...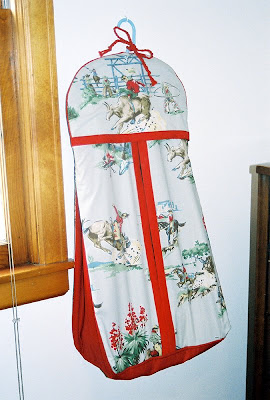
This is one of the only built-ins in our house. The shelves hold his books and other collectables. A cool vintage Roy Rogers toy puzzle and vintage turquoise kids cowboy hat look great up there. Of course you gotta have Woody also...
My folks gave us this rocking chair they had since the 70's. So I stripped and painted it red. I made the chair pads for it with a tan faux suede-ish fabric....

I made these braided leather ties for more of a western look...
I'm pretty proud of this one even though it is a crappy picture. I made this hand embroidered pillow based on one of the images from the fabric in the rest of the room. Yeah, guys can sew too! Anyway, I took quite a while to do but I'm happy with it. I will have to take a better picture of it..
I hope everyone has enjoyed our efforts. I'm sure our Son will also.
NOTE: Thank you to everyone for the kind comments! We had fun doing this project. Knowing that it would be a appreciated by us and by Calvin really helped the project along. It really has come out nicely if I do say so myself. We have been adding bits and pieces here and there and will keep everyone posted on any great new stuff.Thanks again!Brian and Molly

 I rewired both lamps and I think they look pretty slick lit up. Here they are in the living room...
 Here is a detail shot of the base. The roses are not quite our style but I guess we can deal with a couple flowers. I like them I think they look good.


 Well we didn't have any floor lamps in need of a shade so I made a hanging light out of it. It wasn't real hard to do. The shade is flipped upside down to utilize the bracket. We had a bunch of leftover lightweight plexiglass so I made a diffuser. I just cut it to size and scuffed the plexi with sandpaper to give it a frosted look and help with any glare.
 Here it is all lit up. At night it has a nice glow to it. The remote switch I bought has a dimmer function as well which really casts the right amount of light at the touch of a button. This replaced a Target floor lamp which a lot of people have. I think the new light is a nice addition to the living room.


 I think they look really cool when they are lit up.
 She had quite a few of these nifty metal and ceramic ashtrays. I scuffed and repainted the metal stand with some flat black.


 What looks like pink tile is actually paneling. The white "grout lines" are cut into the panels giving the look of tile. The white above are also panels. The whole panel sections are trimmed with the aluminum. I thought this was a pretty slick system. I wish I could find some unused panels like this for myself.

 What can I say... I'm a sucker for TV Lamps. I have always wanted a black panther lamp but have not found the right one. I recently found a great site called


 Posts
Posts